Tuesday, 30 July 2013


old but a very useful trick

Windows XP is a popular operating system used by most PC users. Though Windows XP popularity is decreasing but some PC users still use it due to its versatility, easy to operate and so on.

Windows XP installation process is slow and it annoys most users, it takes around 40 minutes to install. Today, I want to share a trick that can be use to install Windows XP in 15 minutes. To do this, follow the procedure outlined below.

Procedure:

* Boot from Windows XP disk
* After the files have been copied,you will be required to select the location to install Windows XP
* After selecting the disk, the installation process will start and it will show 40 minutes approx time to complete the installation process
* Here is where the trick to quicken the installation process will be used. Just pressShift+F10 a command prompt will appear, now type taskmgr and then press enter. This will bring out the task manager , now click on process tab and locate the process namedSetup.exe
* Finally, right click on Setup.exe and set its priority to high.
Q: - What is DHCP's purpose?
DHCP's purpose is to enable individual computers on an IP network to extract their configurations from a server (the 'DHCP server') or servers, in particular, servers that have no exact information about the individual computers until they request the information. The overall purpose of this is to reduce the work necessary to administer a large IP network. The most significant piece of information distributed in this manner is the IP address. 

Q: - Can DHCP work with Apple Talk or IPX?
No, it is too tied to IP. Furthermore, they don't need it since they have always had automated mechanisms for assigning their own network addresses. 

Q: - What is a MAC address?
A MAC address (also called an Ethernet address or an IEEE MAC address) is a number (typically written as twelve hexadecimal digits, 0 through 9 and A through F, or as six hexadecimal numbers separated by periods or colons, i.e. 0080002012ef, 0:80:0:2:20:ef) which uniquely identifes a computer that has an Ethernet interface. Unlike the IP number, it includes no indication of where your computer is located. In DHCP's typical use, the server uses a requesting computer's MAC address to uniquely identify it. 

Q: - What protocol and port does DHCP use?
DHCP, like BOOTP runs over UDP, utilizing ports 67 and 68.

Q: - Who Created It? How Was It Created?
DHCP was created by the Dynamic Host Configuration Working Group of the Internet Engineering Task Force (IETF; a volunteer organization which defines protocols for use on the Internet). As such, it's definition is recorded in an Internet RFC and the Internet Activities Board (IAB) is asserting its status as to Internet Standardization. As of this writing (June 1998), DHCP is an Internet Draft Standard Protocol and is Elective. BOOTP is an Internet Draft Standard Protocol and is recommended. For more information on Internet standardization, see RFC2300 (May 1998)

Q: - How does DHCP and BOOTP handle multiple subnets?
For the situations where there is more than one LAN, each with its own subnet number, there are two ways. First of all, you can set up a seperate server on each subnet. Secondly, a feature of some routers known as "BOOTP forwarding" to forward DHCP or BOOTP requests to a server on another subnet and to forward the replies back to the client. The part of such a router (or server acting as a router) that does this is called a "BOOTP forwarding agent". Typically you have to enable it on the interface to the subnet to be served and have to configure it with the IP address of the DHCP or BOOTP server. On a Cisco router, the address is known as the "UDP Helper Address".

Q: - Can a DHCP client boot from a BOOTP server?
Only if the DHCP client were specifically written to make use of the answer from a BOOTP server. It would presumably treat a BOOTP reply as an unending lease on the IP address.
In particular, the TCP/IP stack included with Windows 95 does not have this capability.

Q: - Is a DHCP server "supposed to" be able to support a BOOTP client?
The RFC on such interoperability (1534) is clear: "In summary, a DHCP server: ... MAY support BOOTP clients," (section 2). The word "MAY" indicates such support, however useful, is left as an option. A source of confusion on this point is the following statement in section 1.5 of RFC 1541: "DHCP must provide service to existing BOOTP clients." However, this statement is one in a list of "general design goals for DHCP", i.e. what the designers of the DHCP protocol set as their own goals. It is not in a list of requirements for DHCP servers. 

Q: - Can a DHCP server back up another DHCP server?
You can have two or more servers handing out leases for different addresses. If each has a dynamic pool accessible to the same clients, then even if one server is down, one of those clients can lease an address from the other server.
However, without communication between the two servers to share their information on current leases, when one server is down, any client with a lease from it will not be able to renew their lease with the other server. Such
communication is the purpose of the "server to server protocol" (see next question). It is possible that some server vendors have addressed this issue with their own proprietary server-to-server communication. 

Q: - When will the server to server protocol be defined?
The DHC WG of the IETF is actively investigating the issues in inter-server communication. The protocol should be defined "soon".

Q: - How can I relay DHCP if my router does not support it?
A server on a net(subnet) can relay DHCP or BOOTP for that net. Microsoft has software to make Windows NT do this.

Q: - What is DHCP Spoofing?
Ascend Pipeline ISDN routers (which attach Ethernets to ISDN lines) incorporate a feature that Ascend calls "DHCP spoofing" which is essentially a tiny server implementation that hands an IP address to a connecting Windows 95 computer, with the intention of giving it an IP number during its connection process. 

Q: - How can I prevent unauthorized laptops from using a network that uses DHCP for dynamic addressing?
This would have to be done using a mechanism other than DHCP. DHCP does not prevent other clients from using the addresses it is set to hand out nor can it distinguish between a computer's permanent MAC address and one set by the computer's user. DHCP can impose no restrictions on what IP address can use a particular port nor control the IP address used by any client. 

Q: - What is a DHCP lease?
A DHCP lease is the amount of time that the DHCP server grants to the DHCP client permission to use a particular IP address. A typical server allows its administrator to set the lease time. 

Q: - What is a Client ID?
What is termed the Client ID for the purposes of the DHCP protocol is whatever is used by the protocol to identify the client computer. By default, DHCP implementations typically employ the client's MAC address for this purpose, but the DHCP protocol allows other options. Some DHCP implementations have a setup option to specify the client ID you want. One alternative to the MAC address is simply a character string of your choice. In any case, in order for DHCP to function, you must be certain that no other client is using the client ID you choose, and you must be sure the DHCP server will accept it. 

Q: - Can DHCP support statically defined addresses?
Yes. At least there is nothing in the protocol to preclude this and one expects it to be a feature of any DHCP server. This is really a server matter and the client should work either way. The RFC refers to this as manual allocation.

Q: - How is it different than BOOTP or RARP?
DHCP is based on BOOTP and maintains some backward compatibility. The main difference is that BOOTP was designed for manual pre-configuration of the host information in a server database, while DHCP allows for dynamic allocation of
network addresses and configurations to newly attached hosts. Additionally, DHCP allows for recovery and reallocation of network addresses through a leasing mechanism.
RARP is a protocol used by Sun and other vendors that allows a computer to find out its own IP number, which is one of the protocol parameters typically passed to the client system by DHCP or BOOTP. RARP doesn't support other parameters and using it, a server can only serve a single LAN. DHCP and BOOTP are designed so they can be routed.

Q: - What is an IP address?
An IP address (also called an IP number) is a number (typically written as four numbers separated by periods, i.e. 107.4.1.3 or 84.2.1.111) which uniquely identifies a computer that is making use of the Internet. It is analogous to your
telephone number in that the telephone number is used by the telephone network to direct calls to you. The IP address is used by the Internet to direct data to your computer, e.g. the data your web browser retrieves and displays
when you surf the net. One task of DHCP is to assist in the problem of getting a functional and unique IP number into the hands of the computers that make use of the Internet.

Q: - Can DHCP work with AppleTalk or IPX?
No, it is too tied to IP. Furthermore, they don't need it since they have always had automated mechanisms for assigning their own network addresses. 

Q: - Is a DHCP client "supposed to" be able to use a BOOTP server?
The RFC on such interoperability (1534) is clear: "A DHCP client MAY use a reply from a BOOTP server if the configuration returned from the BOOTP server is acceptable to the DHCP client." (section 3). The word "MAY" indicates such support, however useful, is left as an option.

Q: - Can a DHCP server back up another DHCP server?
You can have two or more servers handing out leases for different addresses. If each has a dynamic pool accessible to the same clients, then even if one server is down, one of those clients can lease an address from the other server. However, without communication between the two servers to share their information on current leases, when one server is down, any client with a lease from it will not be able to renew their lease with the other server. Such communication is the purpose of the "server to server protocol" (see next question). It is possible that some server vendors have addressed this issue with their own proprietary server-to-server communication. 

Q: - When will the server to server protocol be defined?
The DHC WG of the IETF is actively investigating the issues in inter-server communication. The protocol should be defined "soon". 

Q: - How can I relay DHCP if my router does not support it?
A server on a net(subnet) can relay DHCP or BOOTP for that net. Microsoft has software to make Windows NT do this. 

Q: - How long should a lease be?
A very relevant factor is that the client starts trying to renew the lease when it is halfway through: thus, for example, with a 4 day lease, the client which has lost access to its DHCP server has 2 days from when it first tries to renew the lease until the lease expires and the client must stop using the network. During a 2- day outage, new users cannot get new leases, but no lease will expire for any computer turned on at the time that the outage commences. Another factor is that the longer the lease the longer time it takes for client configuration changes controlled by DHCP to propogate.

Q: - How can I prevent unauthorized laptops from using a network that uses DHCP for dynamic addressing?
This would have to be done using a mechanism other than DHCP. DHCP does not prevent other clients from using the addresses it is set to hand out nor can it distinguish between a computer's permanent MAC address and one set by the computer's user. DHCP can impose no restrictions on what IP address can use a particular port nor control the IP address used by any client.

Q: - Can a BOOTP client boot from a DHCP server?
Only if the DHCP server is specifically written to also handle BOOTP queries.

Q: - Can DHCP support remote access?
PPP has its own non-DHCP way in which communications servers can hand clients an IP address called IPCP (IP Control Protocol) but doesn't have the same flexibility as DHCP or BOOTP in handing out other parameters. Such a communications server may support the use of DHCP to acquire the IP addresses it gives out. This is sometimes called doing DHCP by proxy for the client. I know that Windows NT's remote access support does this. A feature of DHCP under development (DHCPinform) is a method by which a DHCP server can supply parameters to a client that already has an IP number. With this, a PPP client could get its IP number using IPCP, then get the rest of its parameters using this feature of DHCP. SLIP has no standard way in which a server can hand a client an IP address, but many communications servers support non-standard ways of doing this that can be utilized by scripts, etc. Thus, like communications servers supporting PPP, such communications servers could also support the use of DHCP to acquire the IP addressees to give out. The DHCP protocol is capable of allocating an IP address to a device without an IEEE-style MAC address, such as a computer attached through SLIP or PPP, but to do so, it makes use of a feature which may or may not be supported by the DHCP server: the ability of the server to use something other than the MAC address to identify the client. Communications servers that acquire IP numbers for their clients via DHCP run into the same roadblock in that they have just one MAC address, but need to acquire more than one IP address. One way such a communications server can get around this problem is through the use of a set of unique pseudo-MAC addresses for the purposes of its communications with the DHCP server. Another way (used by Shiva) is to use a different "client ID type" for your hardware address. Client ID type 1 means you're using MAC addresses. However, client ID type 0 means an ASCII string.                                        
Q: - What’s the difference between local, global and universal groups?
Domain local groups assign access permissions to global domain groups for local domain resources. Global groups provide access to resources in other trusted domains. Universal groups grant access to resources in all trusted domains.
Q: -I am trying to create a new universal user group. Why can’t I?
Universal groups are allowed only in native-mode Windows Server 2003 environments. Native mode requires that all domain controllers be promoted to Windows Server 2003 Active Directory.
Q: -What is LSDOU?
It’s group policy inheritance model, where the policies are applied to Local machines, Sites, Domains and Organizational Units. 

Q: - Why doesn’t LSDOU work under Windows NT?
If the NTConfig.pol file exist, it has the highest priority among the numerous policies.

Q: -Where are group policies stored?
%SystemRoot%System32\GroupPolicy 

Q: -What is GPT and GPC?
Group policy template and group policy container. 

Q: - Where is GPT stored?
%SystemRoot%\SYSVOL\sysvol\domainname\Policies\GUID 

Q: - You change the group policies, and now the computer and user settings are in conflict. Which one has the highest priority?
The computer settings take priority. 

Q: -You want to set up remote installation procedure, but do not want the user to gain access over it. What do you do?
gponame–> User Configuration–> Windows Settings–> Remote Installation Services–> Choice Options is your friend. 

Q: - 10. What’s contained in administrative template conf.adm?
Microsoft NetMeeting policies 

Q: -How can you restrict running certain applications on a machine?
Via group policy, security settings for the group, then Software Restriction Policies. 

Q: -You need to automatically install an app, but MSI file is not available. What do you do?
A .zap text file can be used to add applications using the Software Installer, rather than the Windows Installer. 

Q: - What’s the difference between Software Installer and Windows Installer?
The former has fewer privileges and will probably require user intervention. Plus, it uses .zap files. 

Q: -What can be restricted on Windows Server 2003 that wasn’t there in previous products?
Group Policy in Windows Server 2003 determines a users right to modify network and dial-up TCP/IP properties. Users may be selectively restricted from modifying their IP address and other network configuration parameters. 

Q: -How frequently is the client policy refreshed?
90 minutes give or take.

Q: - Where is secedit?
It’s now gpupdate

Q: -You want to create a new group policy but do not wish to inherit.
Make sure you check Block inheritance among the options when creating the policy. 

Q: -What is "tattooing" the Registry?
The user can view and modify user preferences that are not stored in maintained portions of the Registry. If the group policy is removed or changed, the user preference will persist in the Registry. 

Q: - How do you fight tattooing in NT/2000 installations?
You can’t. 

Q: -How do you fight tattooing in 2003 installations?
User Configuration - Administrative Templates - System - Group Policy - enable - Enforce Show Policies Only. 

Q: -What does IntelliMirror do?
It helps to reconcile desktop settings, applications, and stored files for users, particularly those who move between workstations or those who must periodically work offline. 

Q: - What’s the major difference between FAT and NTFS on a local machine?
FAT and FAT32 provide no security over locally logged-on users. Only native NTFS provides extensive permission control on both remote and local files. 

Q: - How do FAT and NTFS differ in approach to user shares?
They don’t, both have support for sharing. 

Q: -Explan the List Folder Contents permission on the folder in NTFS.
Same as Read & Execute, but not inherited by files within a folder. However, newly created subfolders will inherit this permission. 

Q: - I have a file to which the user has access, but he has no folder permission to read it. Can he access it?
It is possible for a user to navigate to a file for which he does not have folder permission. This involves simply knowing the path of the file object. Even if the user can’t drill down the file/folder tree using My Computer, he can still gain access to the file using the Universal Naming Convention (UNC). The best way to start would be to type the full path of a file into Run… window. 

Q: - For a user in several groups, are Allow permissions restrictive or permissive?
Permissive, if at least one group has Allow permission for the file/folder, user will have the same permission. 

Q: -For a user in several groups, are Deny permissions restrictive or permissive?
Restrictive, if at least one group has Deny permission for the file/folder, user will be denied access, regardless of other group permissions.

Q: - What hidden shares exist on Windows Server 2003 installation?
Admin$, Drive$, IPC$, NETLOGON, print$ and SYSVOL. 

Q: - What’s the difference between standalone and fault-tolerant DFS (Distributed File System) installations?
The standalone server stores the Dfs directory tree structure or topology locally. Thus, if a shared folder is inaccessible or if the Dfs root server is down, users are left with no link to the shared resources. A fault-tolerant root node stores the Dfs topology in the Active Directory, which is replicated to other domain controllers. Thus, redundant root nodes may include multiple connections to the same data residing in different shared folders. 

Q: -We’re using the DFS fault-tolerant installation, but cannot access it from a Win98 box.
Use the UNC path, not client, only 2000 and 2003 clients can access Server 2003 fault-tolerant shares. 

Q: - Where exactly do fault-tolerant DFS shares store information in Active Directory?
In Partition Knowledge Table, which is then replicated to other domain controllers. 

Q: -Can you use Start->Search with DFS shares?
Yes.

Q: -What problems can you have with DFS installed?
Two users opening the redundant copies of the file at the same time, with no file-locking involved in DFS, changing the contents and then saving. Only one file will be propagated through DFS.

Q: - I run Microsoft Cluster Server and cannot install fault-tolerant DFS.
Yeah, you can’t. Install a standalone one. 

Q: -Is Kerberos encryption symmetric or asymmetric?
Symmetric.

Q: -How does Windows 2003 Server try to prevent a middle-man attack on encrypted line?
Time stamp is attached to the initial client request, encrypted with the shared key. 

Q: - What hashing algorithms are used in Windows 2003 Server?
RSA Data Security’s Message Digest 5 (MD5), produces a 128-bit hash, and the Secure Hash Algorithm 1 (SHA-1), produces a 160-bit hash. 

Q: - What third-party certificate exchange protocols are used by Windows 2003 Server?
Windows Server 2003 uses the industry standard PKCS-10 certificate request and PKCS-7 certificate response to exchange CA certificates with third-party certificate authorities. 

Q: -What’s the number of permitted unsuccessful logons on Administrator account?
Unlimited. Remember, though, that it’s the Administrator account, not any account that’s part of the Administrators group. 

Q: - If hashing is one-way function and Windows Server uses hashing for storing passwords, how is it possible to attack the password lists, specifically the ones using NTLMv1?
A cracker would launch a dictionary attack by hashing every imaginable term used for password and then compare the hashes. 

Q: -What’s the difference between guest accounts in Server 2003 and other editions?
More restrictive in Windows Server 2003. 

Q: -How many passwords by default are remembered when you check "Enforce Password History Remembered"?
User’s last 6 passwords. 


Q: - What are the pre requisites to install Exchange Server 2007?
1. Microsoft .Net Framework 2.0
2. Microsoft ASP .Net
3. World Wide Web Service
4. MMC 3.0
5. Windows power shell
6. SMTP & NNTP service should not be installed

Q: - What is the order to install Exchange Server 2007 Roles in a exchange Server 2003 organization?
1. Client Access Server Role
2. Hub Transport Server Role
3. Mailbox Server Role
4. Unified Messaging Server role

Q: - What are the versions available in Exchange Server 2007?
There are two types of Exchange Server 2007 version release
64 bit for production environment
32 bit only for non-production environment

Q: - What are the Operating system requirements to install Exchange Server 2007?
Exchange Server 2007 can be installed on
Windows Server 2003 SP2 64-bit,
Windows Server 2003 R2 SP2 64-bit or
Windows Server 2008 64-bit

Q: - What are the Active directory requirements to install Exchange Server 2007?
1. Domain functional level at least windows server 2000 native or higher
2. Schema Master must be run on windows 2003 server with sp1
3. At least one Domain Controller, in each domain with windows server 2003 sp1
4. At least one global catalog server in Active Directory Site which hosts exchange Server 2007
5. 4:1 ratio of Exchange processor to global catalog server processors

Q: - What are the hardware requirements to install Exchange Server 2007?
* Processor – 64 bit processor
* RAM – 2 GB + 5 MB per Mailbox
* Disk Space – At least 1.2 GB on the drive on which you install Exchange
* 200 MB of available disk space on the system drive
* File Format – NTFS

Q: - What are the Software requirements to install Exchange Server 2007?
Following are the software prerequisites to install Exchange Server 2007
1. Microsoft .Net Framework 2.0
2. IIS
3. WWW
4. MMC 3.0
5. Microsoft Windows Power Shell

Q: - What is Transition in Exchange Server 2007?
Transition is the scenario in which you upgrade an existing Exchange organization to Microsoft Exchange Server 2007. To perform the transition, you must move data from the existing Exchange servers to new Exchange 2007 servers. For example, when upgrading from an Exchange Server 2003 or Exchange 2000 Server organization to an Exchange 2007 organization, you perform a transition. When transitioning to Exchange 2007, you cannot perform an in-place server upgrade on an existing Exchange server. Instead, you must install a new Exchange 2007 server into the existing organization, and then move data to the new Exchange 2007 server.

Q: - What is Migration in Exchange Server 2007?
Migration is the scenario in which you upgrade to Exchange 2007 by migrating data from a non-Exchange messaging system to Exchange 2007 or from an existing Exchange organization to a completely new Exchange organization, without retaining any of the Exchange configuration data in the first organization. For example, when merging with another company, you can perform a migration. In this scenario, you move mailboxes and data to the other company’s Exchange organization, without retaining any of the configuration data from your existing Exchange organization. Another example is when upgrading from Lotus Notes to Exchange 2007, you perform a migration. In this scenario, you must move mailboxes and data to the new Exchange 2007 organization, without retaining any of the data from the Lotus Notes organization.
The migration process includes installing a completely new Exchange 2007 organization, and then migrating mailboxes from the old messaging system to the new Exchange 2007 messaging system, using various tools for migration.

Q: - Is it possible to do in place upgrade from Exchange Server 2003 to Exchange Server 2007?
No in-place upgrade on existing Exchange server organization. Install new Exchange Server 2007 server into existing organization, and move data to new server.

Q: - What are the transition options available in Exchange Server 2007

We can make transition in following options
Single forest to single forest you have an existing single forest Exchange 2003 or Exchange 2000 topology, you can transition to a single forest Exchange 2007 organization Single forest to cross forest sIf you have an existing single forest Exchange 2003 or Exchange 2000 topology, you can transition to a cross-forest Exchange 2007 topology
Cross forest to cross forest If you have an existing cross-forest Exchange 2003 or Exchange 2000 topology with Exchange servers and mailboxes in each forest, you can transition to an Exchange 2007 cross-forest topology.
Resource forest to resource forest -
Single forest to resource forest -

Q: -What are the considerations for Exchange Server 2007 to co exists with Exchange server 2000 and Exchange Server 2003?
* Exchange Organization in Exchange Native Mode· Exchange Server 2007 routing group (DWBGZMFD01QNBJR) is created only for coexisting with earlier versions of Exchange.
* Routing Group Connector is required between Exchange Server 2003 and Exchange Server 2007 (created during setup).
* Exchange Server 2003 computers cannot interoperate with the Unified Messaging server role. Exchange 2003 mailboxes cannot be Unified Messaging–enabled.
* Exchange 2003 Front-ends cannot talk to Exchange Server 2007 Mailbox Server Roles.
* No in-place upgrade on existing Exchange server. Install new Exchange Server 2007 server into existing organization, and move data to new server

Q: - Will Front End server talk to Exchange Server 2007 Mailbox server in an Exchange organization having both exchange 2003 and exchange Server 2007?
Exchange Server 2003 Front-end server cannot talk to Exchange Server 2007 Mailbox Server Roles

Q: - What is the status of routing group connector in co existed of Exchange Server 2003 and 2007?
Exchange Organization in Exchange Native Mode· Exchange Server 2007 routing group (DWBGZMFD01QNBJR) is created only for coexisting with earlier versions of Exchange.
Routing Group Connector is required between Exchange Server 2003 and Exchange Server 2007 (created during setup).

Q: - Which service should not be installed in Exchange Server 2007 installation?
SMTP and NNTP service should not be installed

Q: - What are the Exchange Server editions available?
There are two types of Exchange Server 2007 editions available
1. Standard Edition
2. Enterprise Edition 

Q: - What is the difference between standard and Enterprise Edition?
Exchange 2007 functions
Standard Edition
Enterprise Edition
Number of Data Stores Supported

Q: - What to do if exchange Server 5.5 in your organization in order to upgrade to Exchange Server 2007?
You cannot upgrade an existing Microsoft Exchange Server version 5.5 organization to Exchange Server 2007. You must first migrate from the Exchange Server 5.5 organization to an Exchange Server 2003 or an Exchange 2000 Server organization. Then you can transition the Exchange 2003 or Exchange 2000 organization to Exchange 2007. 

Q: - What are the Planning Considerations of Mailbox Server Role?
The Microsoft Exchange Server 2007 Mailbox server role hosts mailbox databases and provides e-mail storage and advanced scheduling services for Microsoft Office Outlook users The Mailbox server role can also host a public folder database, which provides a foundation for workflow, document sharing, and other forms of collaboration
We have to perform a planning consideration on
* Sizing the database,
* Planning for public folder,
* Co hosting with other server roles and
* Planning for clustered Mailbox server

Q: - What are the Planning considerations for Client Access Server Role?
The Client Access server role supports the Outlook Web Access, Outlook Anywhere, and Exchange ActiveSync client applications, in addition to the POP3 and IMAP4 protocols. The Client Access server role also hosts several key services, such as the Auto discover service and Exchange Web Services.
In order to have better client access functionality we have to perform a Planning consideration on Exchange Active Sync. Outlook web Access, outlook anywhere, POP3 and IMAP4 protocols and also securing client access

Q: - What are the Planning Considerations of Hub Transport Server Role?
Hub Transport server role is a required role in a Microsoft Exchange Server 2007 organization that provides routing within a single organizational network by using the Active Directory directory service site. Hub Transport server role installed handles all mail flow inside the organization, apply transport rules, apply journal rules, and deliver messages to recipients’ mailboxes
We have to perform a Planning Consideration on
* Topology for mail flow inside and outside the Exchange organization
* Server capacity – determine how to perform performance monitor
* Security – includes delegation of administrative roles and verification that IP connections are only enabled from authorized servers
* Transport Features – determine the transport features that you will enable at the Hub Transport server and how they will be configured

Q: - What are the Planning Considerations for Edge Transport Server Role?
Exchange Server 2007 Edge Transport server role is designed to provide improved antivirus and anti-spam protection for the Exchange organization. Computers that have the Edge Transport server role also apply policies to messages in transport between organizations. The Edge Transport server role is deployed in an organization’s perimeter network.
* Edge Transport Should not be included in Active Directory
* Should be installed in a Standalone Server
* Edge Transport Should not be Part of the domain
* ADAM Should be Installed
* Pre requisites .Net framework , Windows Management Shell, MMC

Sunday, 14 July 2013

BOSD: Blue Screen of Death (BSOD) is a critical and non-recoverable error in Windows Operating System family (Windows 7/Vista/XP) which causes system crash. Every time a user tries to log-in, Windows gives a BSOD error message. BSOD is generally caused by incompatible DLLs or Device Driver files. An erroneous or incomputable kernel level software update such as an Anti-Virus update may also cause BSOD. Each BSOD displays a specific error code which tell us what wrong happened inside the kernel?

The Problem: Recently, we got a BSOD on one of our Windows 7 64-bit OS. The BSOD was displaying following texts and codes:


SRTSPL64.sys is the file that's causing the problem. It is Auto Protect driver of Symantec Endpoint Protection.

It is not new that Symantec Anti-virus caused Blue Screen of Death . Incidents have been reported  where incompatible/buggy Symantec Endpoint Protection updates caused Blue Screen of Death on Windows Operating System:


Solution: Try to RESTORE your Windows Operating System by restarting it in Safe Mode. If it does not work, then one of simple solutions is to uninstall the buggy/incompatible Symantec Endpoint Protection program.

Restart Windows in Safe Mode and go to Control Panel and uninstall the Symantec Endpoint Protection. If you are getting error The Windows Installer Service could not be accessed. Then you can try manual uninstallation steps given below:
  1. Disable Windows Installer service

a)    For Windows XP: Go to Start menu and select Run. Type services.msc and press enter. For Vista or Windows 7: type Services at Search programs and files box of Start menu, and press Enter.
b)    In Services, select Windows Installer, right-click it and select Properties.

c)     Under Startup type, select Disabled, then OK.

  1. Stop running executables and services belonging to Symantec Endpoint Protection
a)    For Windows XP: Go to Start menu and select Run. Type msconfig and press enter. For Vista or Windows 7: type msconfig at Search programs and files box of Start menu, and press Enter.
b)    Select Startup tab, uncheck StartupItems belonging to Manufacturer Symantec such as “ccapp”.
c)     Select Services tab, uncheck Services belonging to Manufacturer Symantec such as Liveupdate, Symantec Endpoint Protection,  Symantec Event Manager, Symantec Settings Manager, Symantec Management Client, Symantec Network Access Control etc.
d)    Press OK and restart the computer.

The problem should get solved!!!

Note: You can re-install Symantec Endpoint Protection.

Sunday, 7 July 2013

Pre-Installation Checklist
Make sure you have all of the following steps in place before you setup Exchange Server 2010 on Windows Server 2008 R2 64 Bit.
For simplicity we are assuming you are setting up a small office where one machine will be used for both the Active Directory and the Exchange Server. This setup works just fine and reduces the number of machines to maintain. If you have a larger office you may want to consider separating the Active Directory machine and the Exchange 2010 Server. 
Install Windows Server 2008 R2 64 bit version
Exchange 2010 is a 64 bit application and requires 64 bit versions of Windows Server 2003 or Windows Server 2008.  You should select a computer that is capable of running the 64 bit version of Windows Server 2003 or 2008.  For this example, we will start with a clean installation of Windows Server 2008 R2 64 bit version that has not had any roles installed.
After installing Windows Server 2008 R2 we set the clock and the name of the server to be "EX2010".  At this point this server is configured to be a stand alone computer with default settings.

Configure Your Static IP Address
The default installation of Windows 2008 sets your IP v4 and IP v6 addresses to use DHCP.  Since we will be configuring this computer to be a domain controller, you must change the IP address of the computer to be a static IP address.
To change your IP address, click on "View Network Connections" in the Server Manager screen.  This will display the list of active network interfaces.
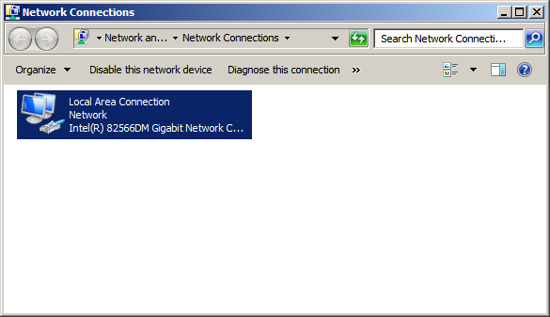
Double click on your network adaptor to display the adaptors status.
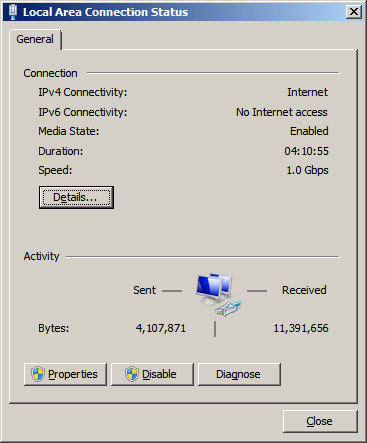
Press the Properties button.
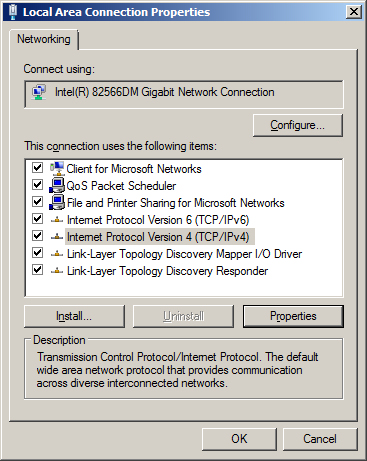
Highlight "Internet Protocol Version 4 (TCP/IPv4)" and then press the Properties button.
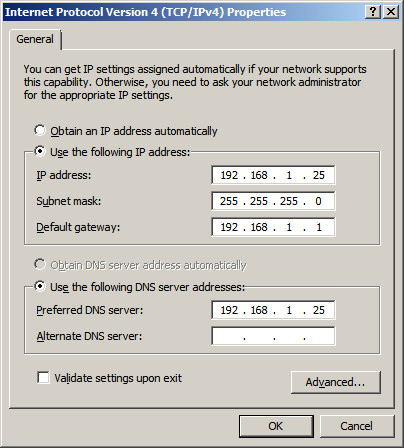
Change the radio button to "Use the following IP address" and enter an IP address you want to use for this server.  In our example, we chose to assign this server the internal IP address "192.168.1.25".  We also have a firewall appliance that operates as a gateway at the IP address "192.168.1.1". 
NOTE: It is important to include this computer in the DNS list.  You should list the IP address of this computer as the first entry in the list of DNS servers.  In the alternate DNS servers field, enter the IP address of a DNS server provided by your ISP.
Press OK to save your changes.
Now you will need to modify the support for IP v6.  If your network uses IP v6, then you will need to select "Internet Protocol Version 6 (TCP/IPv6)" , press the Properties button, then enter a static address.  If you are not using IP v6, you can leave the IP v6 set to the default setting of DHCP.
NOTE:  Exchange requires that IP V6 be enabled.  Even if you do not use IP V6 you must leave it enabled.  During the setup of Active Directory, the Active Directory Setup Wizard will check that both IP v4 and IP v6 have static addresses.  As long as the IP v4 address is static you can continue the installation.  DO NOT DISABLE IP V6 or else the Exchange Hub Transport Service will not start.
At this point you should have all IP addresses on this server configured as static IP addresses.  OR you have the IP v4 address configured as static and the IP v6 configured using DHCP.  Press OK to save your changes and close the Network Connection screen.
Activate Auto Update
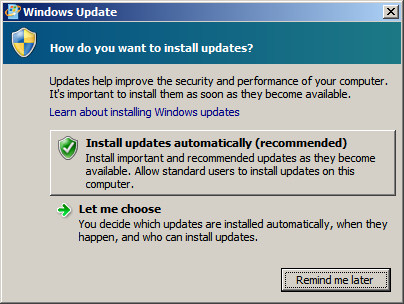
The next step in making this server a Domain Controller is to activate auto update.  Active Directory will not install until this computer has auto updates active.  To activate auto updates, click on the link "Configure Updates" and then select the option to have Windows automatically install updates.   At this time Windows will download updates and will most likely need to reboot your computer.  Allow the updates to be applied and the computer to be restarted until all updates are applied before installing Active Directory.  You do not want to be in the middle of installing Active Directory when an auto update needs to reboot your computer.
Add role - Active Directory Services
The process of installing Active Directory consists of two steps:  the first step is to install Active Directory and the second step is to configure your Active Directory.  Once this is complete, your Windows Server will now be a Domain Controller.
Step 1 - Install Active Directory
At the Computer Management Screen, press the "Add Roles" link. 
At the Select Server Roles dialog, check/tick the option "Active Directory Domain Services".
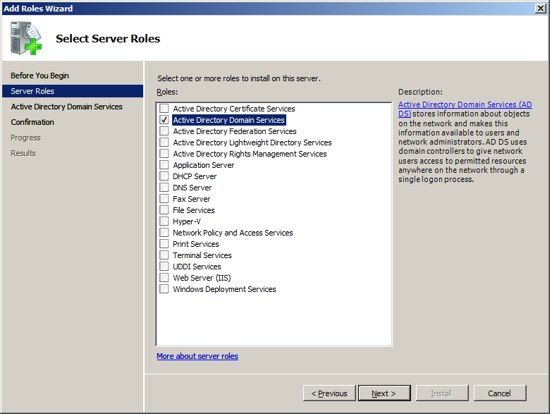
When you select Active Directory the Select Server Roles Screen will inform you that you also need to install the feature ".NET Framework 3.5.1".  Press the "Add Required Features" button.
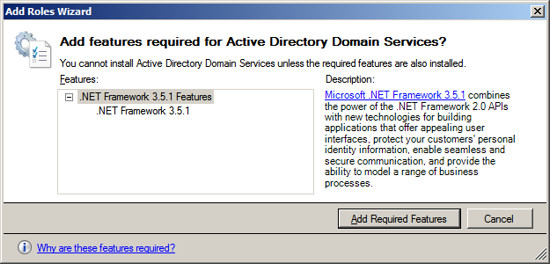
After acknowledging the required feature, press Next.
Active Directory Domain Services will present information about the changes it will make to your server.  Review this information and press Next.
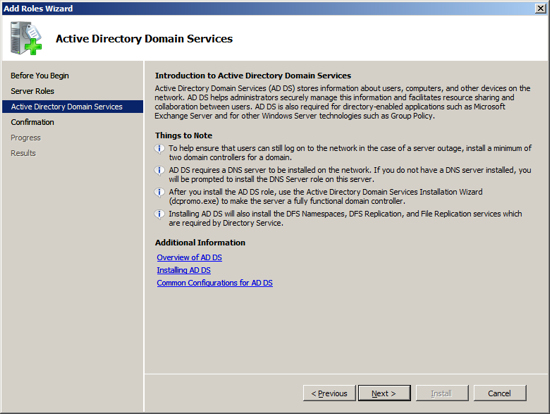
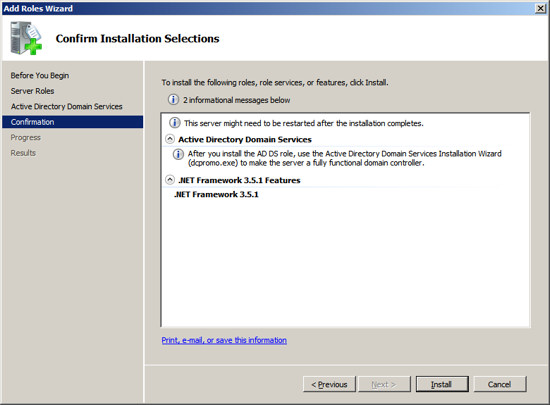
Now the installation will scan your configuration and inform you if there are any pre-requisites that you have not fulfilled.  If the Active Directory Installation presents an errors, correct these at this time and then repeat the installation.  Once the Setup program indicates that you have met all pre-requisites, then press the Install button to start the installation process.
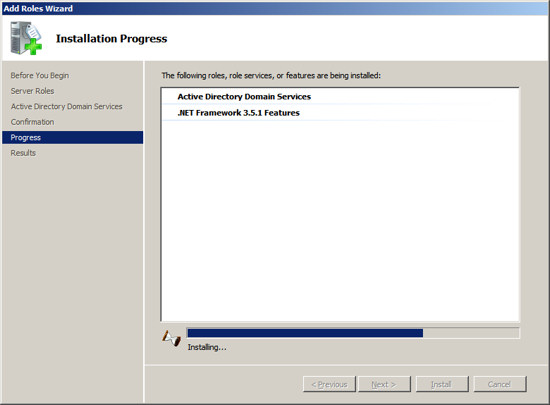
The setup program will now install Active Directory on your Server.
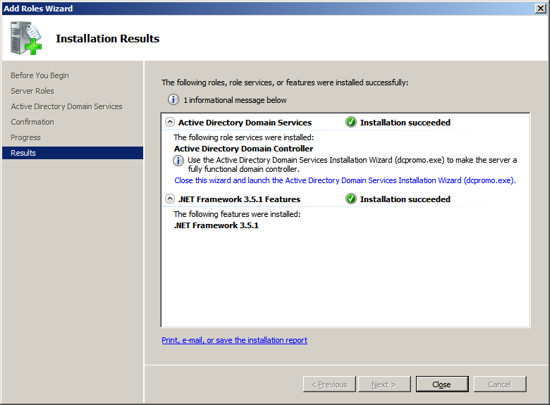
When the installation is complete, you should see a message indicating "Installation Succeeded". 
Press Close to return to the Server Management Screen.
Step 2 - Configure Active Directory
At the Server Management screen you should now see that you have 1 role installed.  The Active Directory Domain Services may indicate that it is installed but there are errors.  This is because the software is installed but not configured.
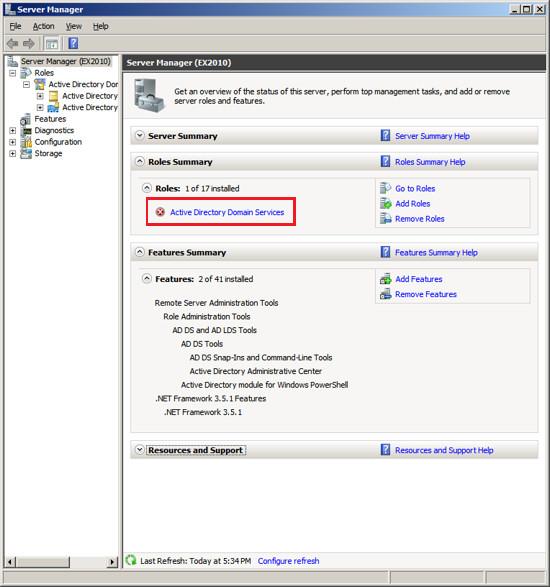
To configure Active Directory, click on the line under Roles labeled "Active Directory Domain Services".  The Server Manager will show you a page about the status of the Active Directory Role.
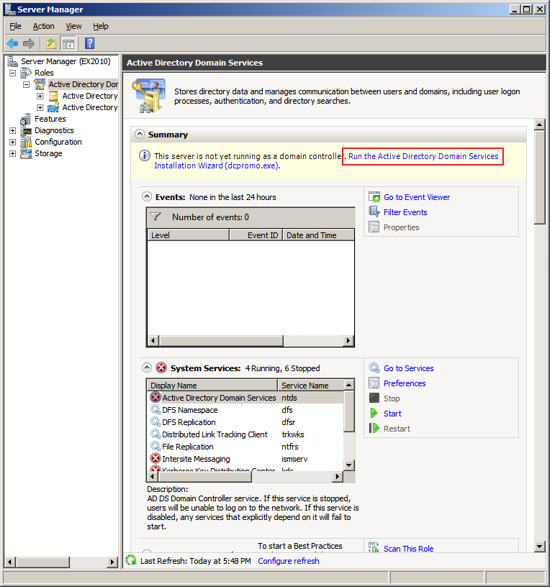
Click on the link "Run the Active Directory Services Installation Wizard (dcpromo.exe)".  When the Active Directory Domain Services Installation Wizard appears, press Next.
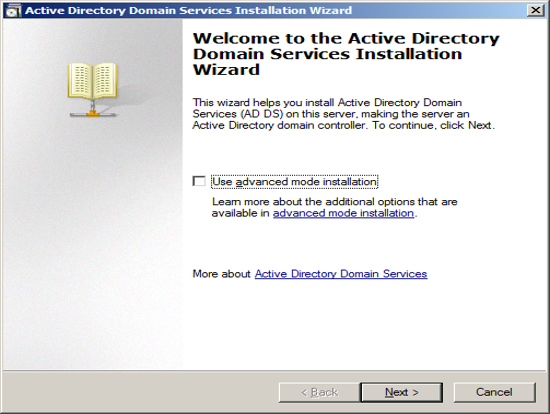
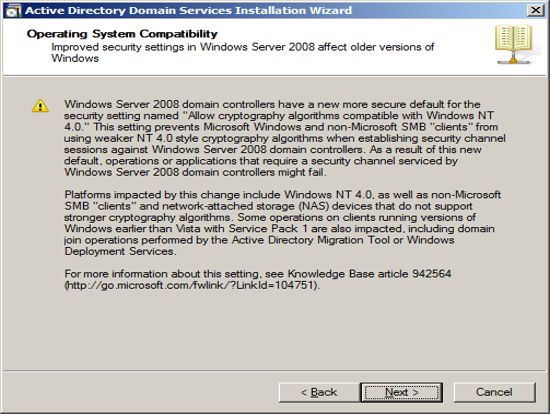
The Installation Wizard will present information about the version of Active directory, press Next.
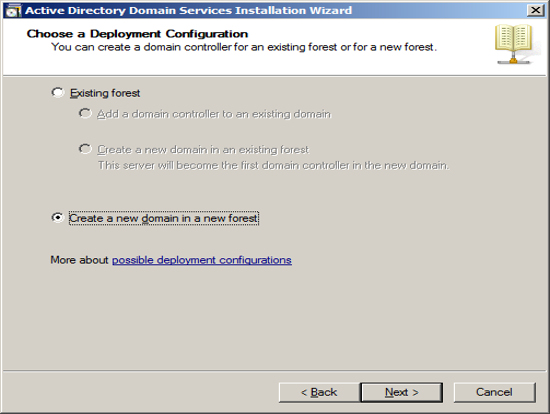
Since we are assuming this Exchange Server will be the first Domain Controller, we choose "create a new domain in a new forest".  Press Next.
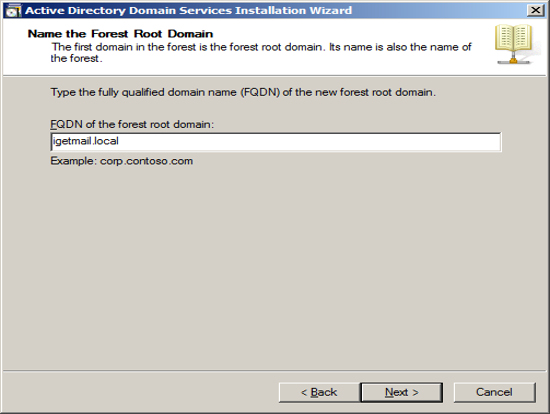
Enter the name of your domain.  The domain name you enter here is the domain name that Exchange will associated with all of your email.  If you use a hosting company to host your Internet Domain, then you may want to enter the name of your Internet domain with ".local".  If you host your own Internet Domain then you would enter your domain name here.
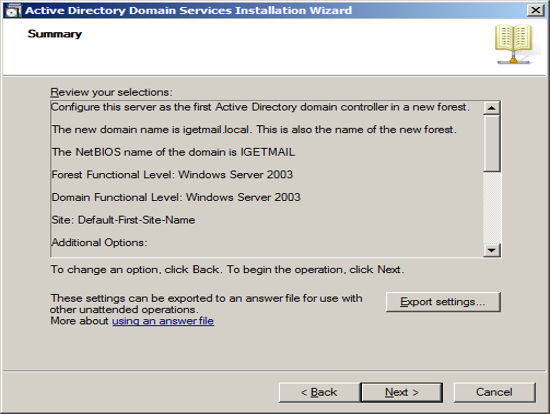
In our example, we are assuming that IGetMail.com is hosted at an Internet Hosting Company.  Since we do not host IGetMail.com on this Exchange Server, we will use IGetMail.local to indicate our internal domain for IGetMail. 
NOTE:  Once you enter your domain name it is very hard to change it in the future, so you should take great care when enter this name. 
Once you have decided on the name of your internal domain, that will be your Active Directory Domain and the domain serviced by Exchange, press Next.
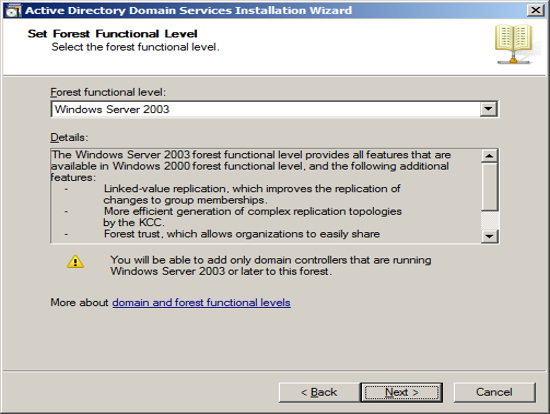
The Installation Wizard will now ask you about compatibility.  If you plan to have domain controllers running various versions of Active Directory, then you will want to chose a function level to include the lowest version of Windows that you are using for domain controllers.  Press Next.
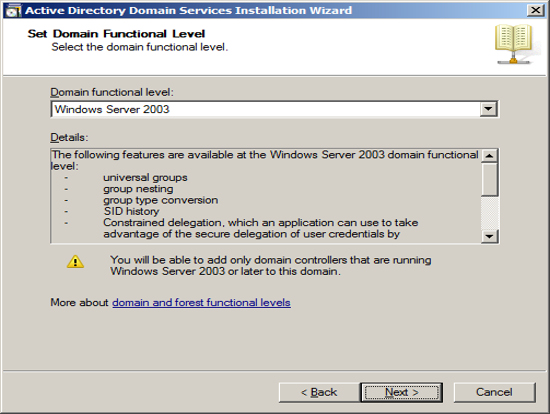
You will be asked a similar question which is at the domain level instead of the forest level on the previous screen.  You should follow the same approach and include the function level to include the lowest version of Windows you plan to use for domain controllers.  Press Next.
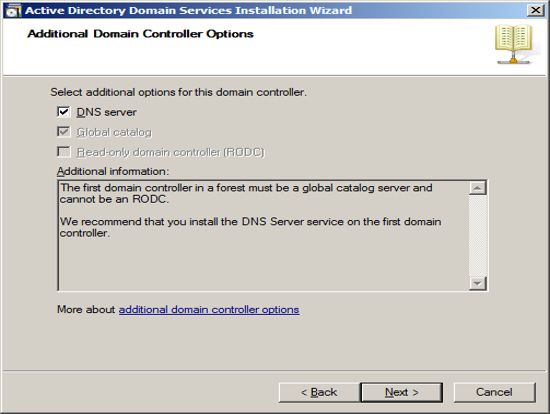
The first Domain Controller needs to have a DNS server running locally.  The optimal location is to start out with having the installation wizard install the DNS server locally.  Also, it will automatically make this computer a global catalog server.  Press Next.
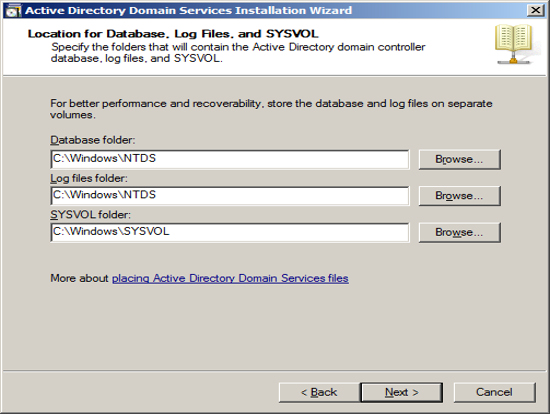
You can specify where you want Active Directory to store its data.  If you only have one drive in your Server, then use the defaults.  If you have multiple drives, you can select which drive to use.  Press Next.
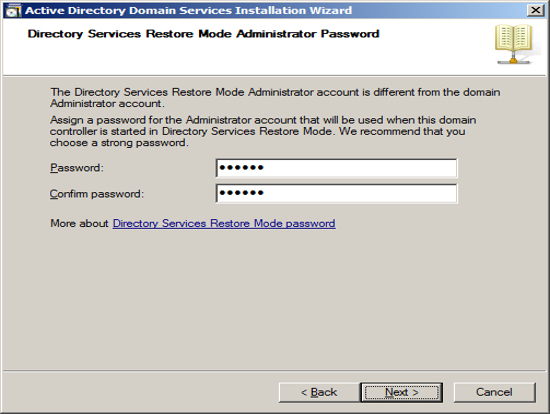
Should you need to restore Active Directory in the event of a hard drive failure, you will need to boot your Server into a special mode called "Directory Restoration Mode".  Should you need to boot your computer into this special mode, you will need to use a special password just for this restoration.  You can define this password at this time.  NOTE:  This password is different than the administrator account and if you change the administrator password this password will not change.  So you will need to store this password forever in a safe place.  Press Next.
Now the Installation Wizard will summarize the configuration that it is about to create.  To start the process of configuring your new Domain Controller, press Next.
The Installation Wizard will show its progress as it configures your Server.   This will take a long time.
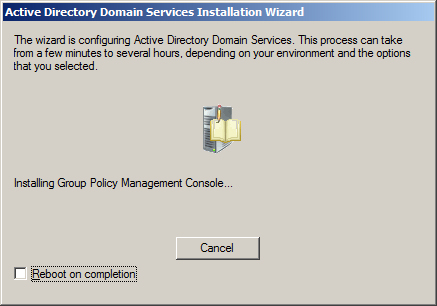
When the installation is complete, you will be shown a final screen.  Press Finish.
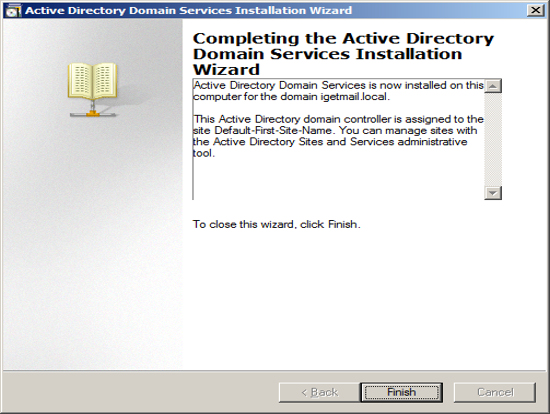
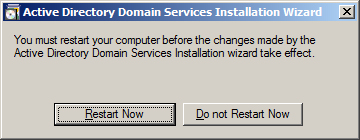
Then restart your computer.
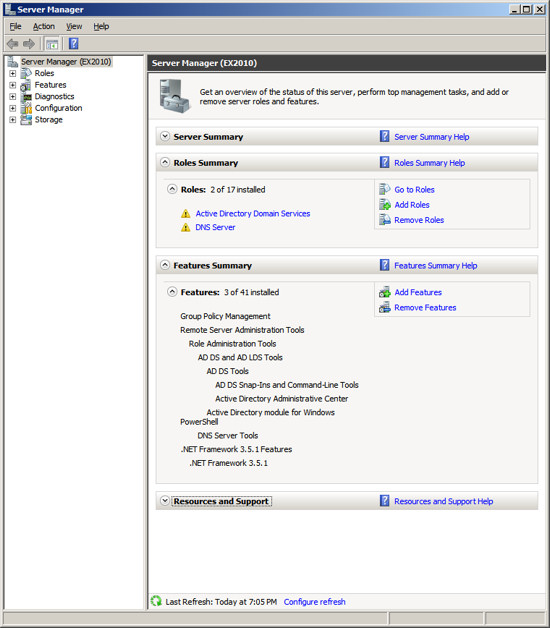
After restarting your computer, Windows should show you the Server Manager.  You should see on the Server Manager screen that you have Active Directory and DNS Server roles installed.  Also the process of installing Active Directory will add the features "Group Policy Management" and "Remote Server Administration Tools".
Add role - Active Directory Lightweight Services
Now that have your Server configured for Active Directory, Exchange requires that you add the Lightweight Service.  NOTE:  Exchange only requires that the Lightweight services are installed.  It does not require the Lightweight Services to be configured. 
Click on the link "Add Roles" and then select to add the role "Active Directory Lightweight Directory Services" and press Next.
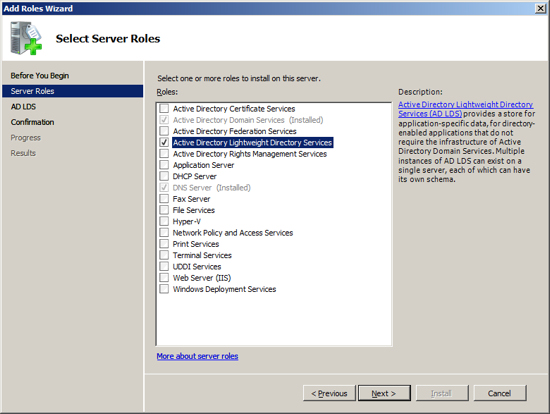
The installation wizard will inform you that it will make the following modifications to your server.  Press Next.
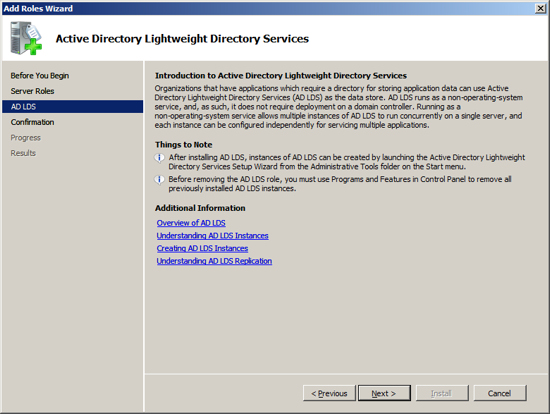
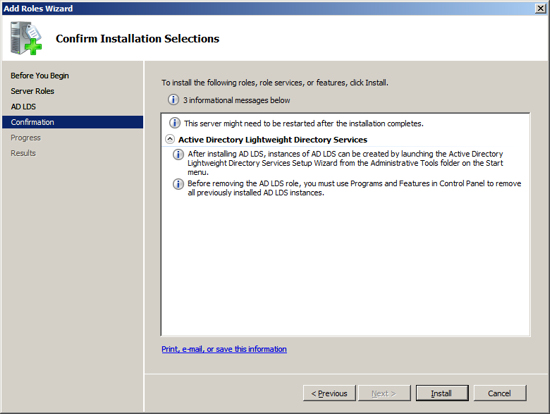
The installation wizard will confirm your intention, press Install to begin.
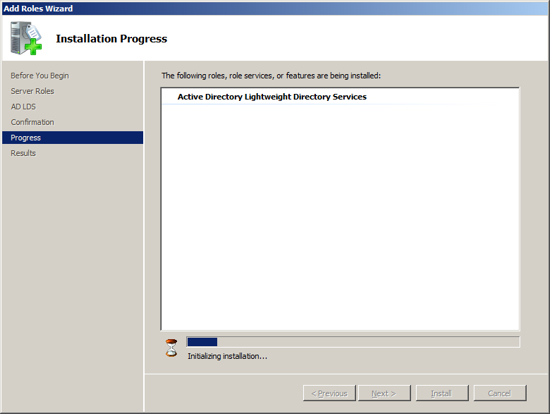
The installation wizard will show its progress.
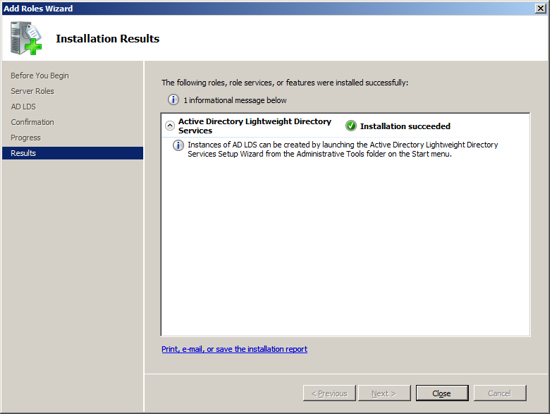
And finally when the role has been installed, the installation wizard will show its results.  Press Close and then proceed to configure this newly installed role.
At this point your Server Manager should show you that you have the Active Directory Lightweight Directory Services installed.  This is sufficient for Exchange.  If you want to create LDS instances you are welcome to, but that task is not required by Exchange.
Add feature - Windows Process Activation Service
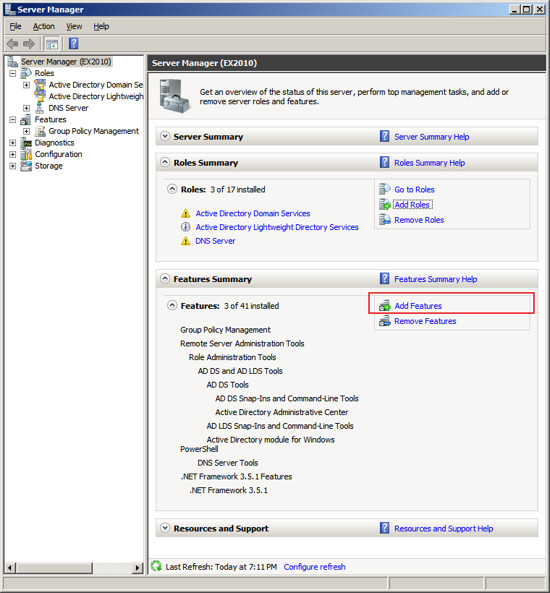
The next feature that Exchange needs installed is the "Windows Process Activation Service".  To install this feature, click on the link "Add Features".
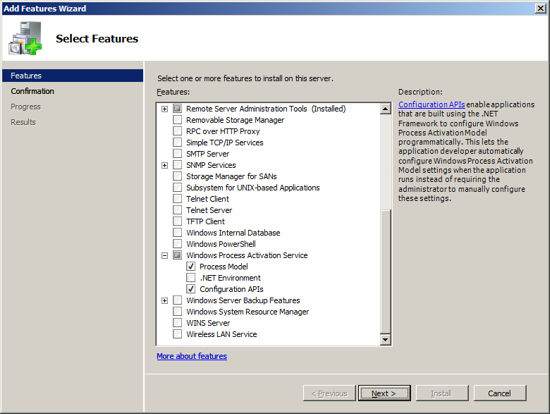
At the Select Features screen, check/tick the feature "Windows Process Activation Service". 
Select the items under this service and press Next.
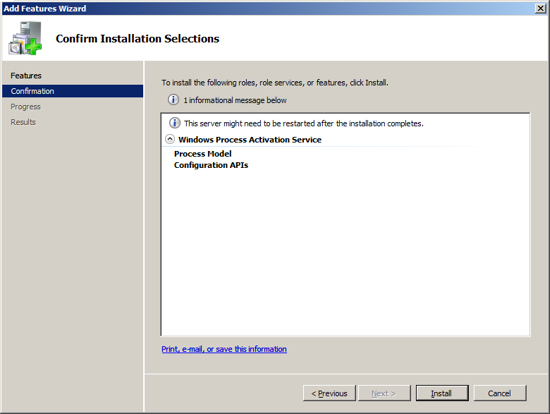
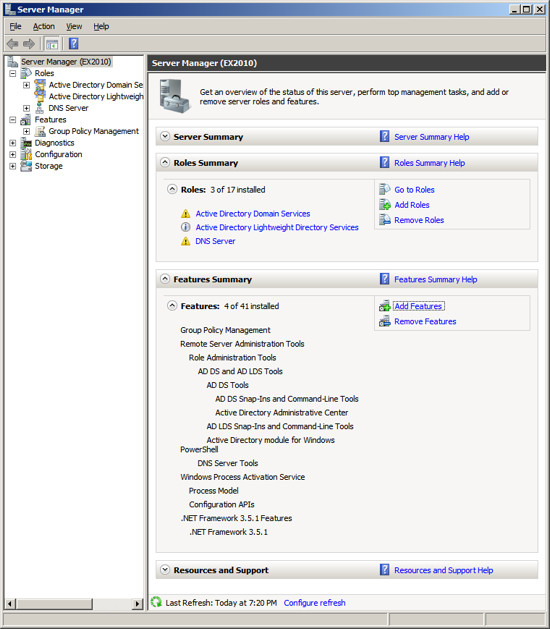
Confirm your selections and press Install.  Windows will now install this feature and when it is complete, press Close to return to the Server Manager.
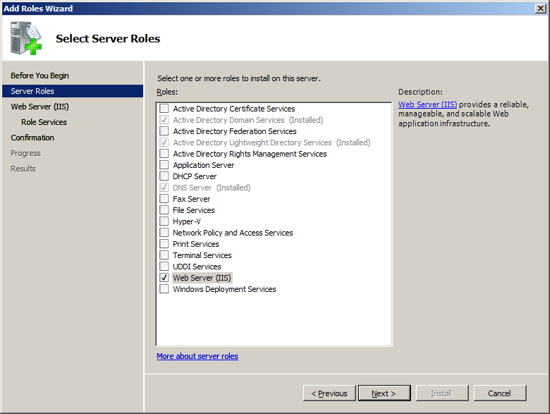
Add role - Web Server (IIS)
The next Role that Exchange needs installed is the Web Server IIS.  To install this role, at the Server Manager click on "Add Roles".
At the Select Server Roles screen, check/tick the role "Web Server (IIS)" and press Next.
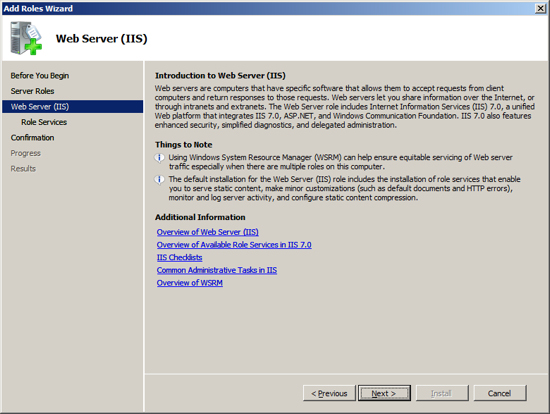
The Web Server IIS installation will present information about what it will perform.  Press Next.
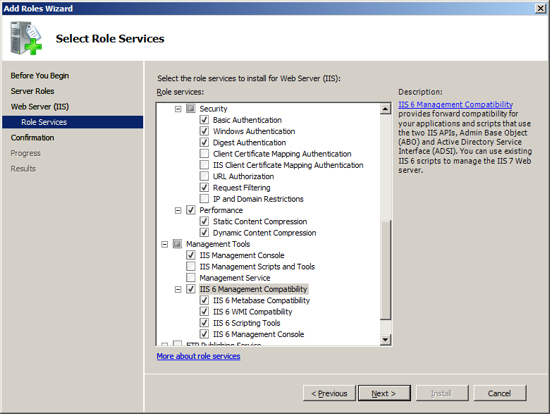
Exchange requires that several additional services be added to the default settings in IIS. 
In addition to the default settings, check/tick the following additional services:
  • Security - Basic Authentication
  • Security - Windows Authentication
  • Security - Digest Authentication
  • Performance - Dynamic Content Compression
  • Management Tools - IIS 6 Management Compatibility (include all items under this service)
Press Next.
The Web Server installation wizard allows you to verify your selections.  Press Install to begin.

The installation wizard will now install IIS on your Exchange Server.
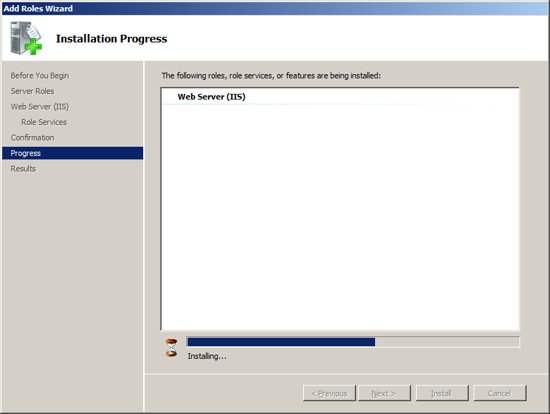
When IIS is installed, press Close to return to the Server Manager.
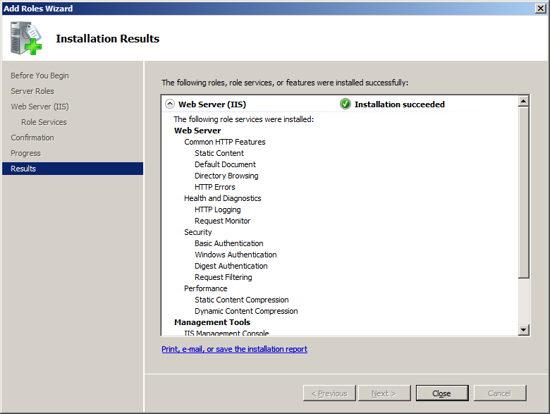
Add feature - PowerShell
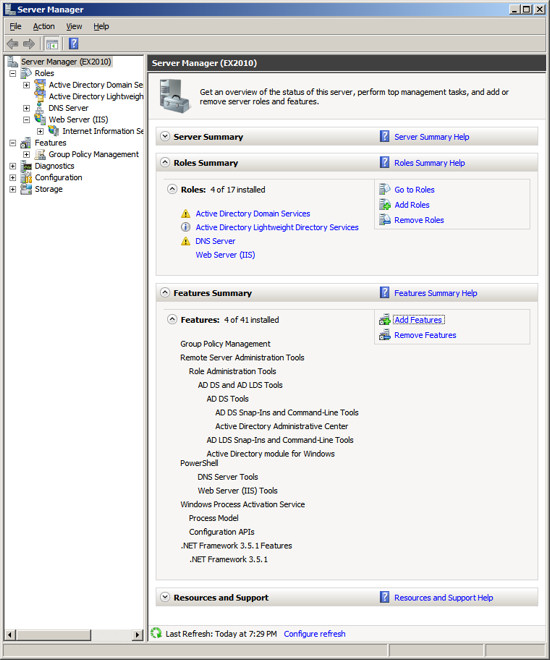
Now you are ready to install the next feature that Exchange requires as a prerequisite:  "Windows Power Shell".  At the Server Manager click on the link "Add Feature".
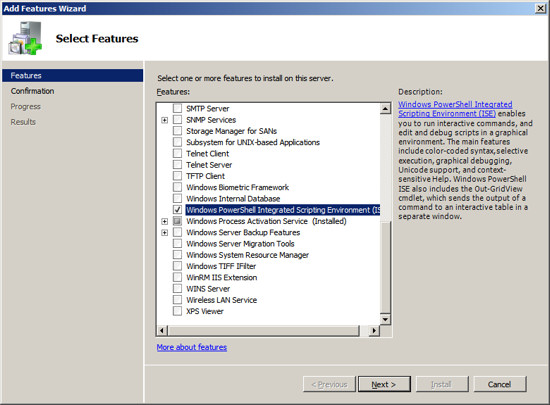
Select the Feature "Windows Power Shell" and press Next.
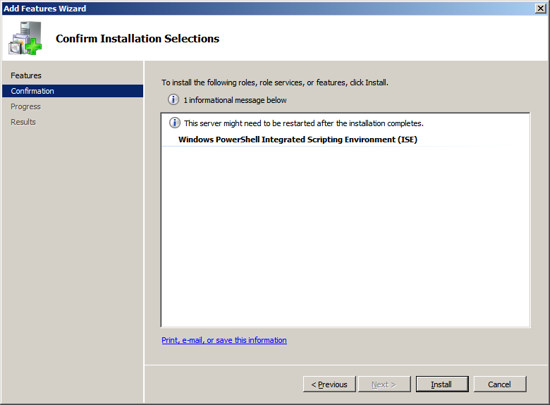
At the installation confirmation screen, press Install to begin the process of installing this feature. 
When the Power Shell feature is installed, press Close to return to the Server Manager.
We have just 2 more items to meet Exchange's Requirements.
Enable TCP Port Sharing
When you install Windows Server 2008, the default setup disables a service that is needed by Exchange.  You will need to enable this service.
At the Server Manager screen - expand "Configuration" in the left hand panel.  Then click on "Services".  The middle of the screen will show the installed Services.  Scroll to the Service named "Net.Tcp Port Sharing Service".
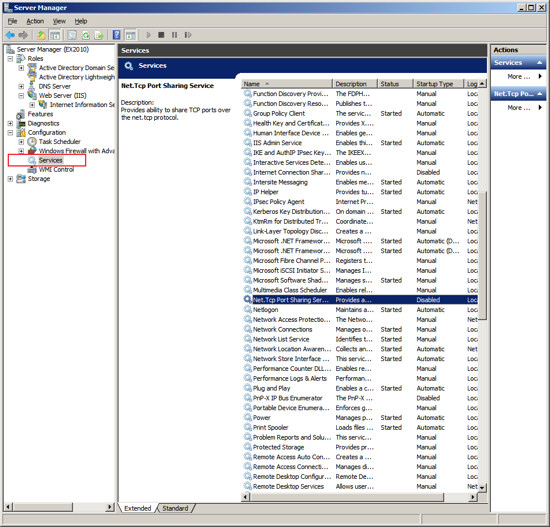
Right Click on the Service "Net. Tcp Port Sharing" and choose Properties.
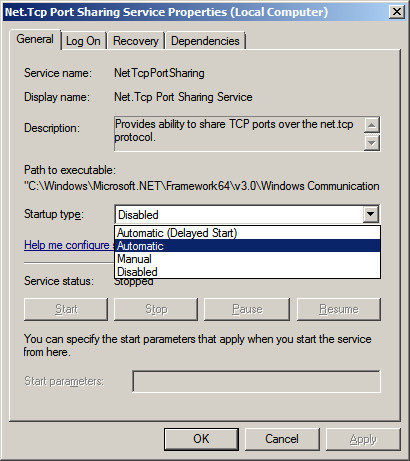
Change the Startup from Disabled to Automatic.
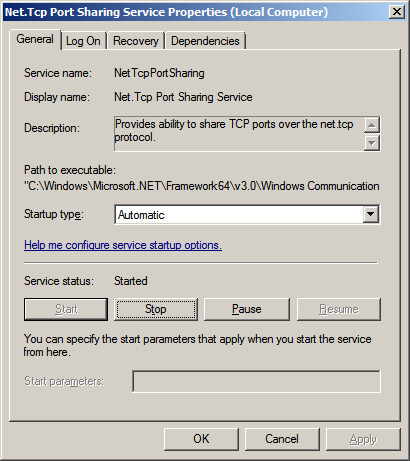
Press OK to save your changes.
Apply the 2007 Office System Converter
You will need to download the 2007 Office System Converter Pack.  Click on this link to go to Microsoft's Download Site. 
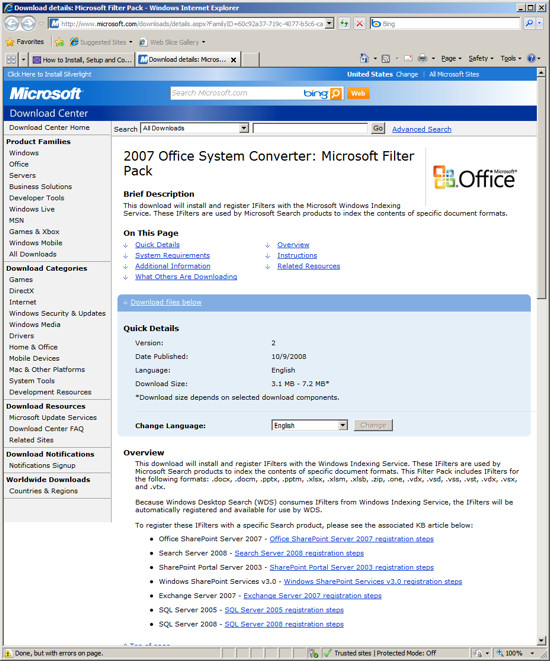
Click on the link "Download Files Below".  Then press the "Download" button next to the File Name "FilterPackx64.exe".
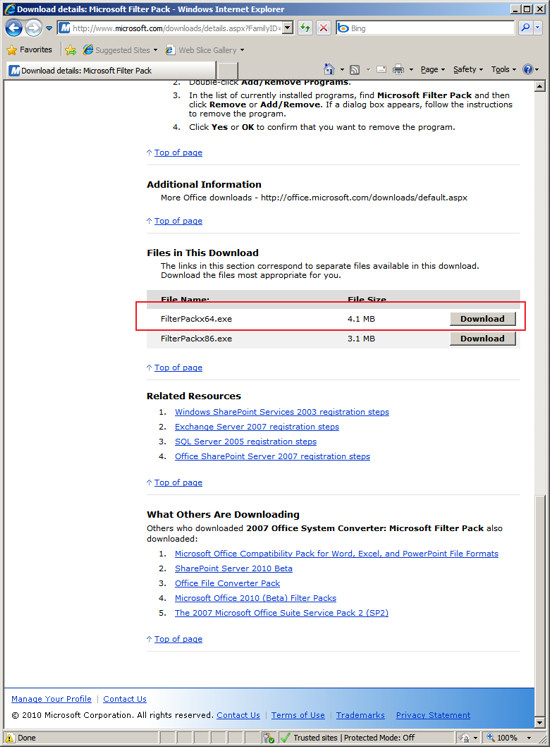
Download and install the Filter Pack:
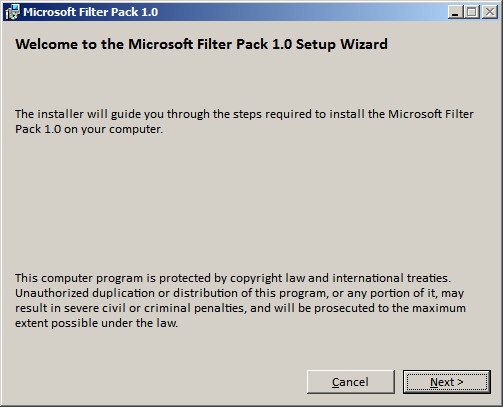
Press Next and proceed through the wizard.
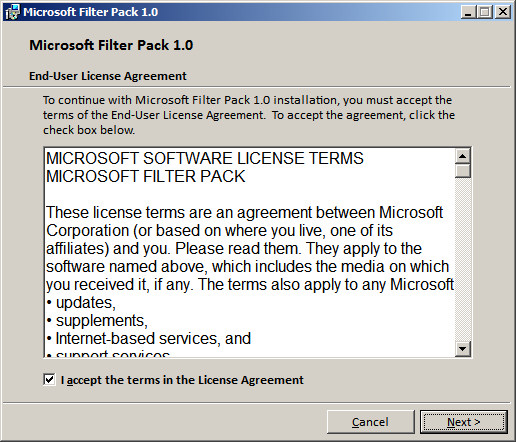
When you have completed the Filter Pack installation you are now ready to install Exchange 2010.
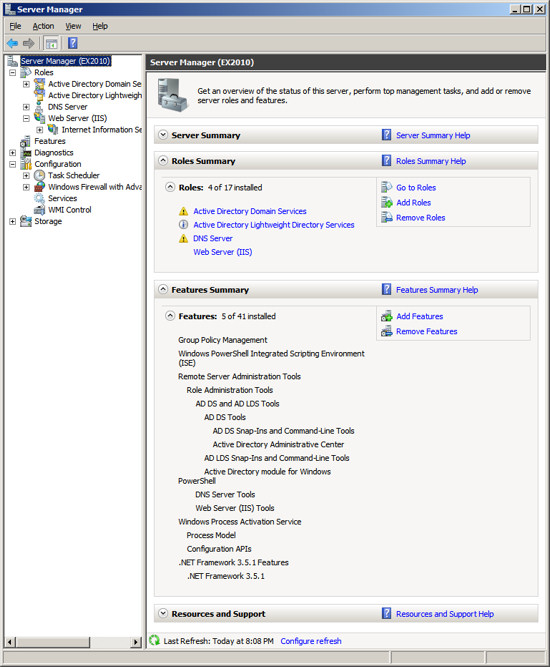
Roles / Features NOT to install
Exchange has a requirement to use its own SMTP service and not the SMTP Role that is built into Server 2008.  As a result, you must not install the SMTP feature from the Server Manger.  This will be installed by Exchange.  Note that the Exchange Setup wizard will issue a warning that the SMTP services are not already installed, yet if you install the Windows 2008 SMTP feature, the Exchange Setup will consider that an error.
Installing Exchange Server 2010
You are now ready to install Exchange Server 2010. 
When you run the Exchange Server setup, the first 2 steps have been completed and will be inactive.  The next step you need to perform is to select the Language Option.  Click on "Choose Exchange Language Option".
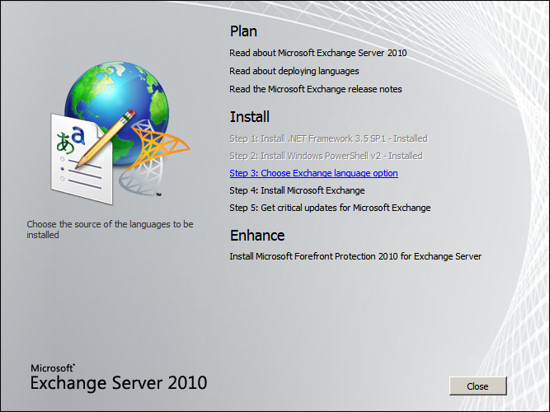
Now select the language option that is appropriate for your environment.
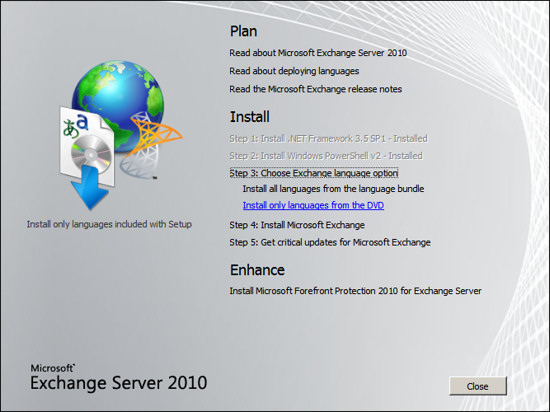
After selecting your language option you are ready to being the installation. 
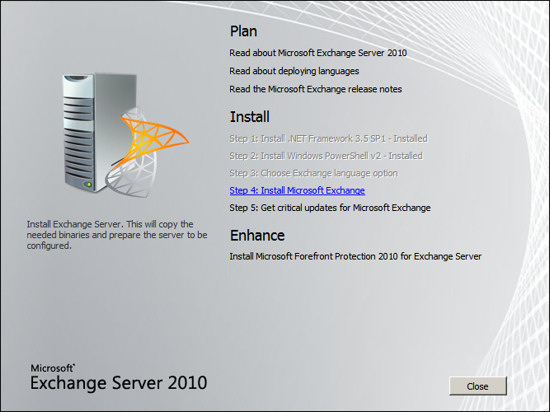
Click on the link "Install Microsoft Exchange."
The Exchange Server 2010 setup wizard will present information about the task it will perform, press Next.
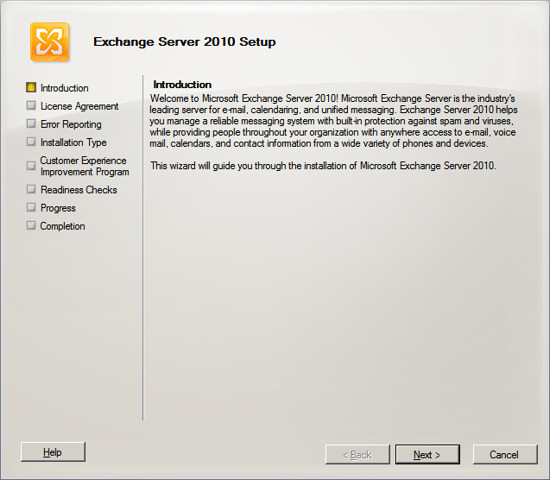
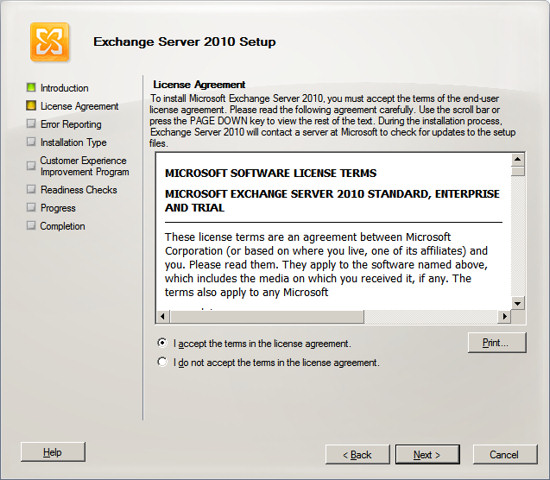
Accept the license agreement and press Next.
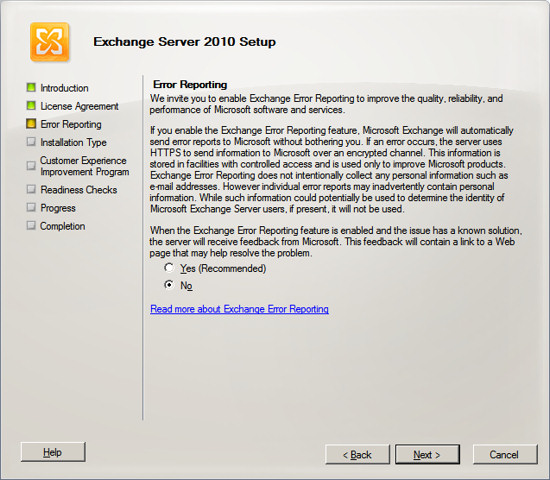
You can choose to participate in error reporting if you wish, press Next.
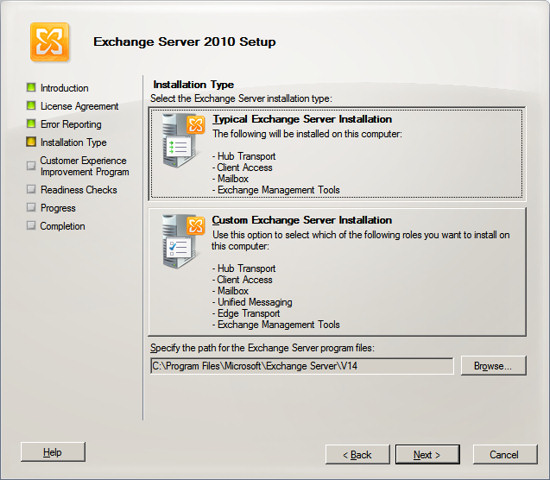
Since this is Exchange Server is intended to be our only Exchange server, we will chose the typical installation which installs all of the components to make this Exchange receive, store and send email.  Select "Typical Exchange Server Installation" and press Next.
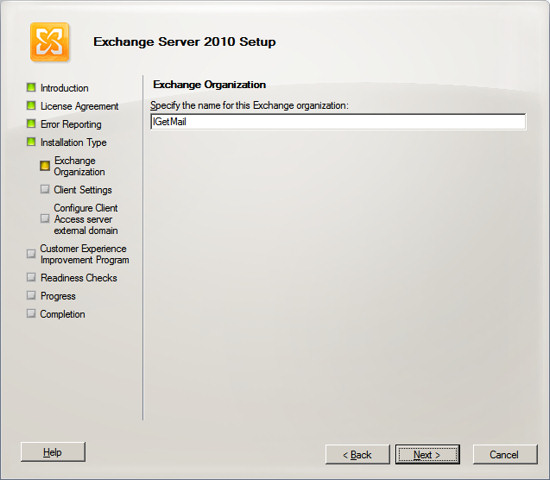
Enter the name of your organization, typically this corresponds to your company name or domain name.  Press Next.
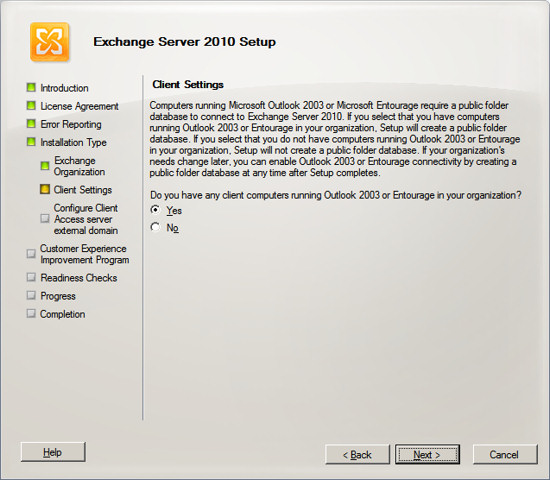
If you intend to use Outlook 2003 clients to connect to this Exchange Server, then chose Yes to provide compatibility with these clients, then press Next.
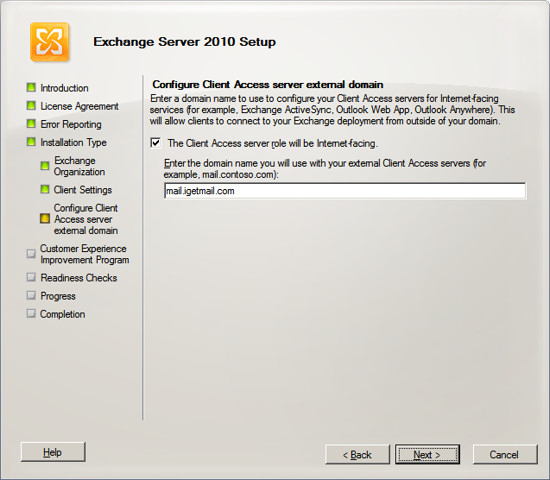
Exchange will now ask what you want to specify for the Internet facing side of Exchange.  In our example, using IGetMail we would create the Internet facing side of Exchange as mail.igetmail.com.
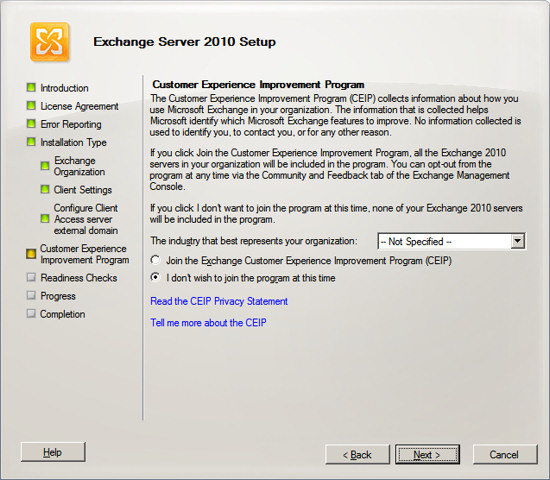
Next Exchange Setup will ask if you want to join the Customer Experience Program. 
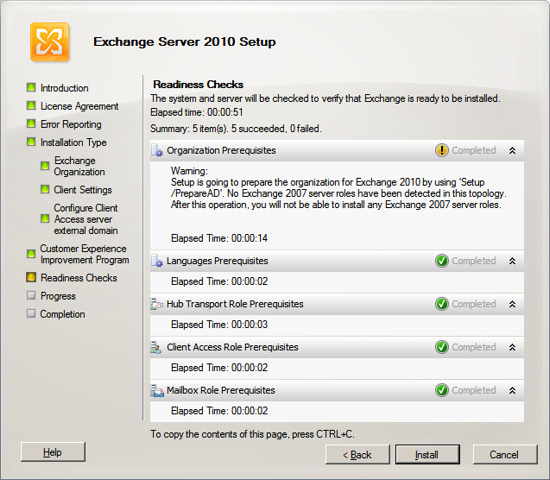
Exchange will now verify that all prerequisites are met.  If there are any items that Exchange needs, it will inform you at this time.  If the prerequisites have all been met, then press Install to begin the installation.
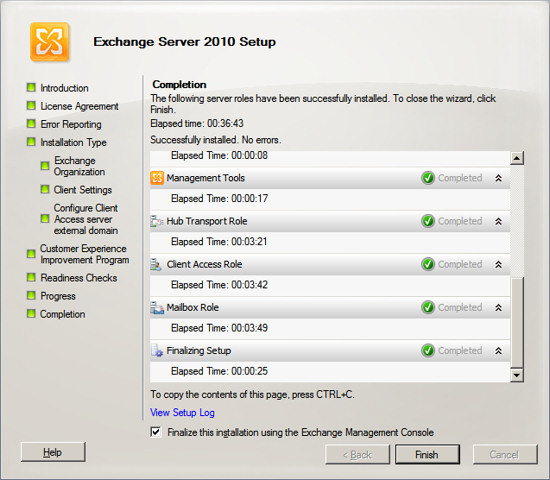
When the Exchange Server 2010 installation wizard completes, it will show the results of installing each component within Exchange Server.  You should see all components with a green check mark. 
Press Finish and your Exchange Server should now be ready to use.
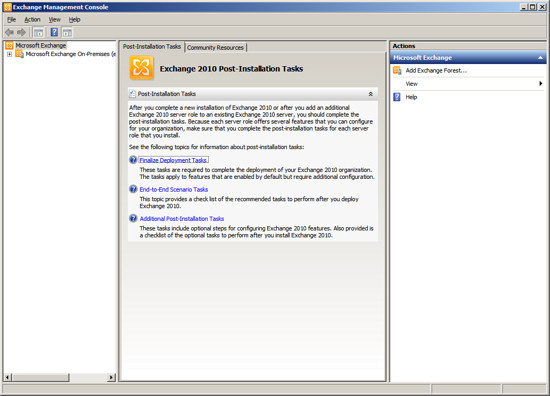
When Exchange completes its installation, the Exchange System Manager will appear.  The Exchange System Manager will guide you through several post installation tasks.
Allow IGetMail access to your Exchange Server
IGetMail Version 3.x instructions:
When you are running IGetMail version 3.x you can instruct IGetMail to send email to your Exchange server using an authenticated user or anonymous access.
Authenticated User Access - With this method you instruct IGetMail to use a specific Exchange user account to connect to the Exchange Server.  Once connected through this account, IGetMail can send email to any of your Exchange user accounts.  In order to use this method, the Exchange user account must be a member of the Exchange Server Group within Active Directory.
To setup Authenticated Access:
  1. Open the Exchange Management Console
  2. Expand "Server Configuration"
  3. Select "Hub Transport"
  4. In the middle section of the Management Console you will see the list of Receive Connectors.
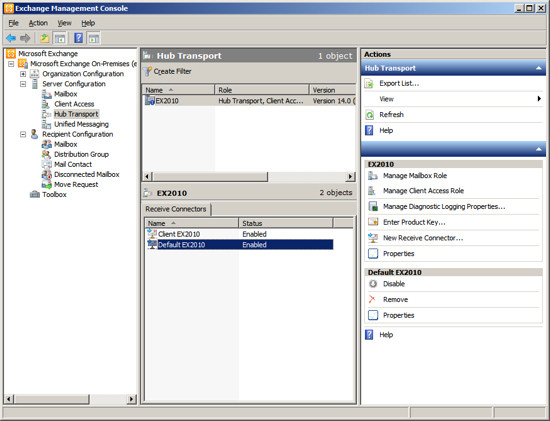
  1. Right click on the Receive Connector "Default ServerName" and choose Properties
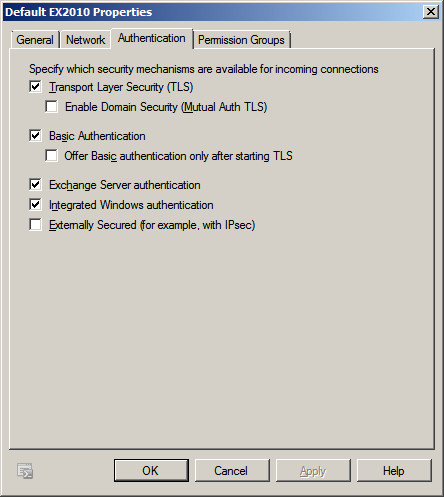
  2. Select the "Authentication" tab.
  3. If you do not have an SSL certificate from a third party SSL provider, then Uncheck / Untick the option "Offer Basic authentication only after starting TLS".  By default Exchange will not allow users to authenticate until you have an SSL certificate.  Unchecking / Unticking "Offer Basic authentication only after starting TLS," allows Exchange to offer Authenticated login over standard SMTP.
When you configure IGetMail, you will need to specify a Windows user that meets these two requirements.
  • The Windows account must have a mailbox in Exchange
  • The Windows user must be a member of the group "Exchange Servers"
Commonly, the Administrator account does not work because it does not have a mailbox and a standard Windows account is normally not a member of the Exchange Server group.  To solve this you can either give the administrator a mailbox, or in our example below we created a Windows user, made this Windows user a member of the "Exchange Servers" groups, and then created a mailbox for the user.  In our example this new Windows user is named "IGetMail".
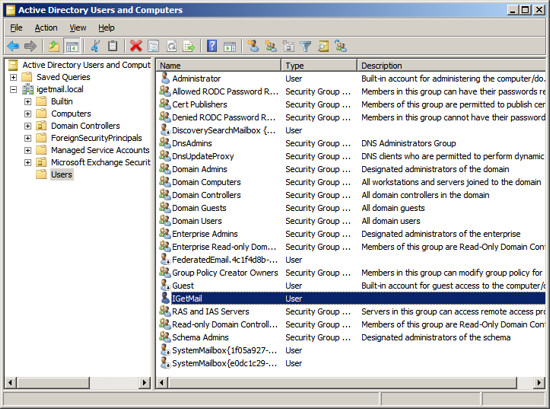
  1. Run Active Directory for Users and Computers.
  2. Select the Users group in the column on the left.
  3. Right Click and add a new user.  In our case we choose to name this new user "IGetMail" since we will use this Windows user account to route the email through as the email is delivered to all of the other users within Exchange.
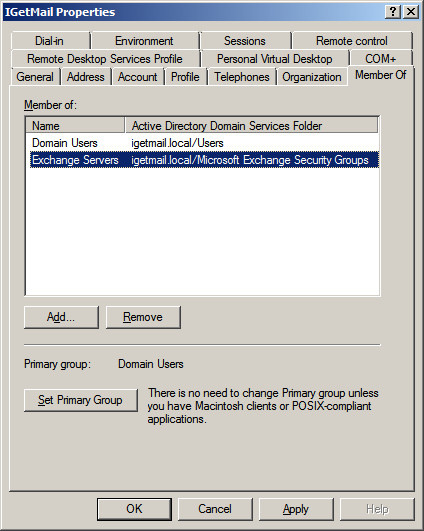
  1. Select the Window user account that you want to have IGetMail use to connect to your Exchange Server.  Right click on the user name and choose Properties.
  2. Go to the "Member Of" panel.
  3. Press the Add... button.
  4. Add the Group "Exchange Servers" to make this Windows account a member of the "Exchange Servers" group.  This will grant this Windows account the rights to route email to other users.  This is needed for IGetMail to route email to your users.
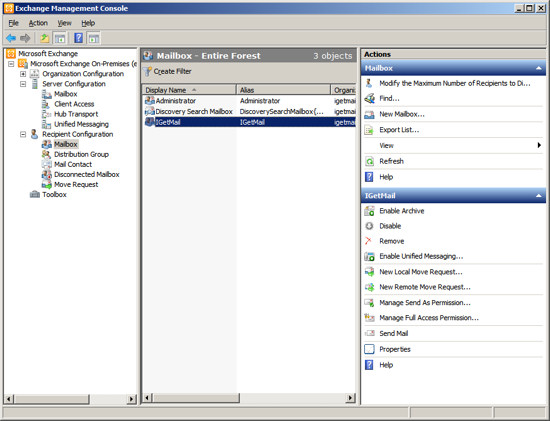
Next we need to add a mailbox to the Windows account that IGetMail will use for authentication.
  1. Run the Exchange Management Console
  2. Expand "Recipient Configuration"
  3. Select Mailbox to show a list of existing Exchange Users
  4. Right Click on "Mailbox" under "Recipient Configuration" and select New Mailbox or Click on New Mailbox in the Actions Column on the right hand side.
  5. Add the Windows account that you want IGetMail to use to the list of Exchange users. In our example below we have added the account "IGetMail" to the list of Exchange Users.
Now Run IGetMail
  1. At the Status Panel, press the "Modify SMTP Settings" button.
  2. Check / Tick the option "Authenticate as - "
  3. Enter the Name of a Windows User Name that you want IGetMail to use to connect to the Exchange Server.  This Windows account must have a mailbox in Exchange and must be a member of the "Exchange Servers" group.
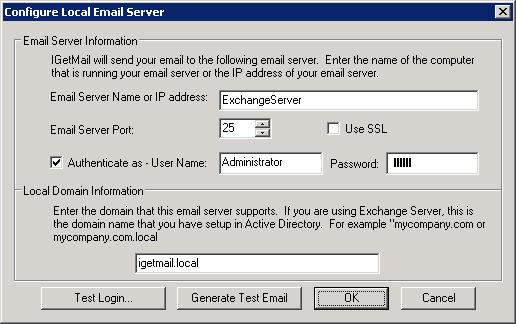
IGetMail is now configured to send email to your Exchange Server. 

To Setup Anonymous Access:
Anonymous access - With anonymous access you can allow anyone to send email to any of your users.  In this case, IGetMail only has to connect to the Exchange Server.  It does not need to log into a Windows Account.
To configure Exchange to allow any user to route email perform these steps:
  1. Open the Exchange Management Console
  2. Expand "Server Configuration"
  3. Select "Hub Transport"
  4. In the middle section of the Management Console you will see the list of Receive Connectors

  1. Right click on the Receive Connector "Default ServerName" and choose Properties
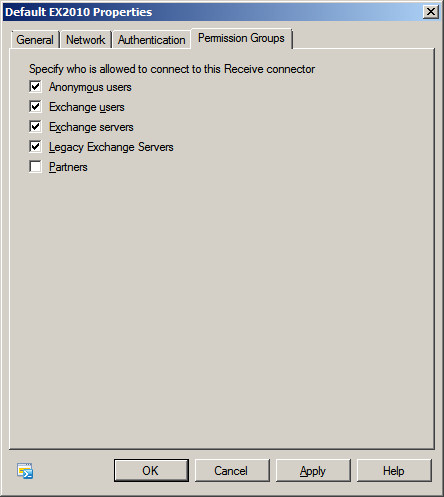
  2. Select the "Permissions Group" tab
  3. Check / Tick "Anonymous Users"
  4. Save your changes
  5. Now anyone can connect to the Exchange Server and route email to any user
IGetMail Version 1.x and 2.x instructions:
When you are running IGetMail Version 2.x and 1.x you need to allow anonymous SMTP connections for your server.
Method 1 - Run the Exchange Management Console.  Expand the Server Configuration and select Hub transport.  In the lower half of the screen under the tab "Receive Connectors" right click on the connect labeled "Default <Name Of Your Server>" and select Properties.  At the Properties for the default server select the Permissions Group tab.  At the Permissions Group Tab, check / tick the option Anonymous and save your changes. 
Method 2 - Run the following management shell command (note this is the Exchange Management shell and not the PowerShell):

Set-ReceiveConnector -Identity "Default <ServerName>" -PermissionGroups "AnonymousUsers"
Where you would replace <ServerName> with the computer name of this server.

Adding E-Mail Users
Run the Exchange Management Console.  Expand the item "Recipient Configuration" and select Mailbox.

Click on the option "New Mailbox" in the right hand panel under the Actions column heading.
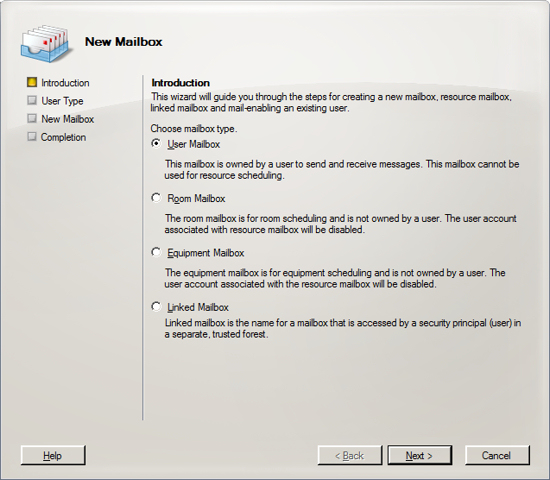
Proceed through the wizard to create each of your new users.

Unordered List

Sample Text

Popular Posts